

はじめに
こんにちは、ラクマの@itinaoです。
E2Eテストについて、概要からお手軽に試す方法までを全5編で記載しています。
- E2Eテスト: 導入の必要性・何を導入するのか
- E2Eテスト: TestCafeを試す ← 今回はココ
- E2Eテスト: Github Actions上でTestCafeを試す(PCブラウザ編)
- E2Eテスト: Github Actions上でTestCafeを試す(モバイルブラウザ編)
- E2Eテスト: Selenium Gridを試す
前回の記事で何のために導入するのか・何を導入するのか?を決め、
今回はお手軽にE2Eテストを導入できるTestCafeにフォーカスを置き、使い方について説明をしていきます。
TestCafeを使ってみる
TestCafeとは
Developer Express Inc.という海外の企業から提供されており、 最初のコミットが2015年の4月で、最初のリリースが2016年10月と比較的新しいE2Eテストフレームワークです。
特徴としては、 テスト環境の構築が楽、 Chrome・IE・Edge・Safari・FireFoxなど主要なブラウザでテスト可能、などが挙げられます。 ざっくりと書きましたが、詳細は公式のドキュメントを見ていただければと思います。
https://devexpress.github.io/testcafe/
実行してみる
インストール
$ npm install -g testcafe
Configファイルの配置
.testcaferc.json というファイル名でRootディレクトリに配置します。
テスト対象の指定・レポートの出力・スクリーンショットやビデオに関する内容等を記述できます。
{
  "src": "e2e/src",
  "reporter": "list",
  "screenshots": {
    "path": "reports/screenshots/",
    "fullPage": true
  }
}
詳細はこちらをご参照ください。 https://devexpress.github.io/testcafe/documentation/reference/configuration-file.html
テストファイルの配置
上記で指定したディレクトリに配置します。
import { Selector } from 'testcafe';

fixture `Getting Started`
    .page `http://devexpress.github.io/testcafe/example`;

test('My first test', async t => {
    await t
        .typeText('#developer-name', 'John Smith')
        .click('#submit-button');
});
実行
$ testcafe chrome
 Running tests in:
 - Chrome 88.0.4324.192 / macOS 10.13.6

 ✓ Getting Started - My first test


 1 passed (4s)
基本操作はこのように、楽ちんです。
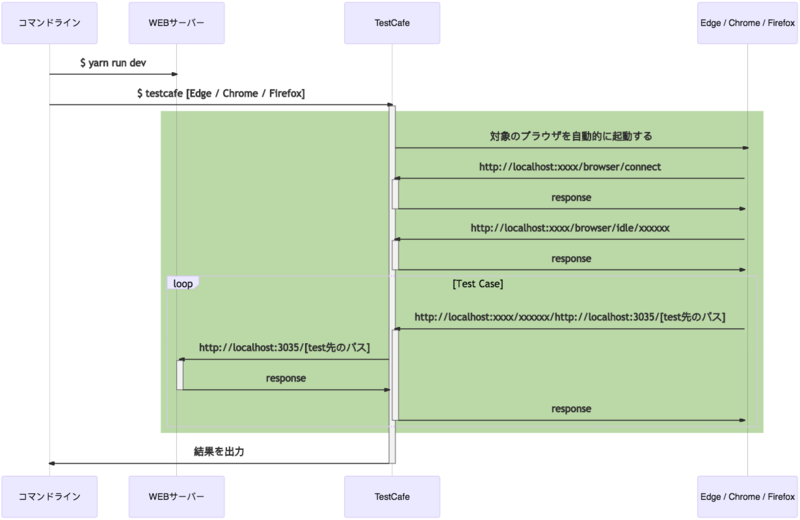
運用で使うには、下記のようにWEBサーバーを起動して、それに対してE2Eテストをする流れかと思います。
モバイル端末のテスト実行について
方法としては、下記の3通りあります。
- Appium
- Appiumを使い、エミュレーターや実機と疎通できるようにする
- TestCafeのテスト対象をremoteにする
- TestCafeをremoteで起動し、出力されたURLをエミュレーターや実機からブラウザを開くことでテストを行う
- BrowserStack等の外部サービス
- 外部サービスを使い、外部からアクセスをしてもらう
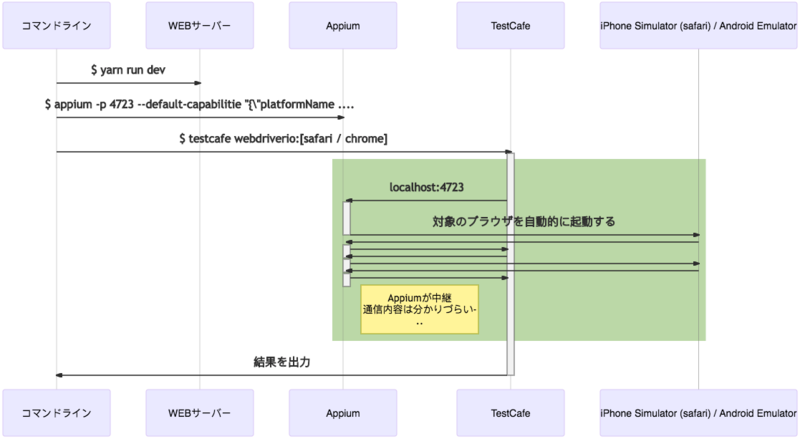
Appium
AppiumはSelenium WebDriverの一種で、HTTP 経由でWebDriver APIを通して操作を受け付けるという仕組みです。
Appiumが実行出来る環境かは、Appium Doctorを使うことで調べることができます。
$ appium-doctor --ios

# or

$ appium-doctor --android
https://github.com/appium/appium-doctor
チェックするのはモバイル端末を扱える環境にあるかどうかで、 iPhone Simulator / Android Emulator はローカルで起動できる状態にしないといけません。
ちなみに、Carthageがなくても、うまく動作しました。
$ appium-doctor --ios
info AppiumDoctor Appium Doctor v.1.16.0
info AppiumDoctor ### Diagnostic for necessary dependencies starting ###
info AppiumDoctor  ✔ The Node.js binary was found at: /Users/hogetaro.hoge/.volta/tools/image/node/12.18.0/bin/node
info AppiumDoctor  ✔ Node version is 12.18.0
info AppiumDoctor  ✔ Xcode is installed at: /Applications/Xcode.app/Contents/Developer
info AppiumDoctor  ✔ Xcode Command Line Tools are installed in: /Applications/Xcode.app/Contents/Developer
info AppiumDoctor  ✔ DevToolsSecurity is enabled.
info AppiumDoctor  ✔ The Authorization DB is set up properly.
WARN AppiumDoctor  ✖ Carthage was NOT found!
info AppiumDoctor  ✔ HOME is set to: /Users/hogetaro.hoge
...
実行例(iPhone Simulator)
前準備
$ npm install -g appium appium-doctorインストールしておく$ appium-doctor --iosが成功している状態Carthageはなくても大丈夫っぽい
- XcodeからテストをしたいiPhone Simulatorをインストールしておく
- testcafe-browser-provider-webdriverioをインストールしておく
- REMOTE_PORTのデフォルトが4444になってるので、TestCafe起動時にAppiumのポート(4723)を指定する
一応、Simulatorがあるかを確認します。 iPhone Simulatorの場合は自動で起動し、自動でシャットダウンするのでその辺りは省略できました。
# Simulatorの存在確認
$ xcrun simctl list
そして、諸々を起動します。
# サーバー起動しておく(テスト対象が既に起動していたら不要)
$ yarn run dev

# Appiumを起動しておく
$ appium --default-capabilitie "{\"platformName\":\"ios\", \"automationName\":\"XCUITest\", \"deviceName\":\"iPhone X\", \"browserName\":\"Safari\", \"language\":\"ja\", \"local\":\"ja_JP\", \"newCommandTimeout\":\"0\"}" --log-timestamp --log-no-color

# TestCafeの起動
$ REMOTE_PORT=4723 testcafe webdriverio:safari
ちなみに、Appiumで指定できるパラメータはこれです。
http://appium.io/docs/en/writing-running-appium/caps/
http://appium.io/docs/en/writing-running-appium/server-args/
実行例(Android Emulator)
前準備
$ npm install -g appium appium-doctorインストールしておく$ appium-doctor --androidが成功している状態- testcafe-browser-provider-webdriverioをインストールしておく
- REMOTE_PORTのデフォルトが4444になってるので、TestCafe起動時にAppiumのポート(4723)を指定する
Emulatorを作成し、起動しておきます。
# 利用できるパッケージはあるか
$ sdkmanager --list

# なかったらインストール
$ sdkmanager "system-images;android-30;google_apis;x86_64"

# AVD(Android Virtual Device)の作成
$ android create avd -n test -k "system-images;android-30;google_apis;x86_64"

# AVDの起動
$ emulator -avd test
そして、諸々を起動します。
# サーバー起動しておく(テスト対象が既に起動していたら不要)
$ yarn run dev

# Appiumを起動しておく
$ appium --default-capabilitie "{\"platformName\":\"android\"}"  --log-timestamp --log-no-colors --allow-insecure chromedriver_autodownload

# TestCafeの起動
$ REMOTE_PORT=4723 testcafe webdriverio:chrome
TestCafeのテスト対象をremoteにする
TestCafeのテスト対象をremoteにするとURLが出力され、そのURLにブラウザからアクセスするとテストが実行されます。
$ testcafe remote
Connecting 1 remote browser(s)...
Navigate to the following URL from each remote browser.
Connect URL: http://192.168.1.130:53768/browser/connect
ちなみに、--qr-codeのオプションを使うとQRコードが出力され、同一ネットワークの端末からお手軽にテストができます。
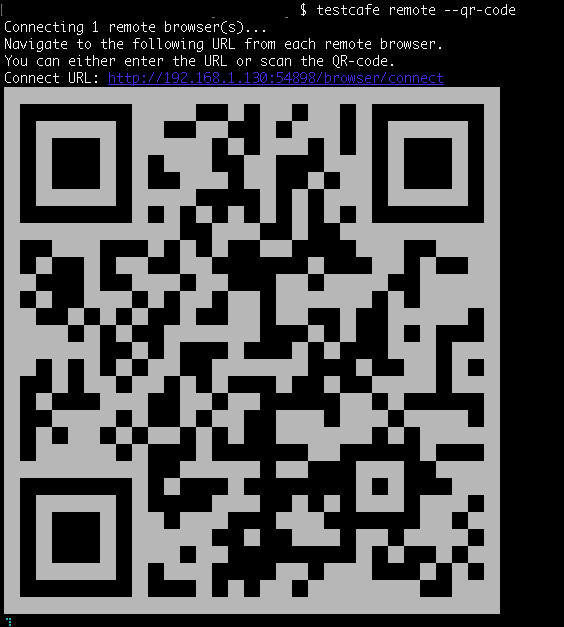
この機能を利用してテストを実行していきます。
実行例(iPhone Simulator)
前準備
- XcodeからテストをしたいiPhone Simulatorをインストールしておく
Simulatorの起動
# Simulatorの存在確認
$ xcrun simctl list

# Simulatorの起動
$ xcrun simctl boot "iPhone X"
そして、諸々を起動します。
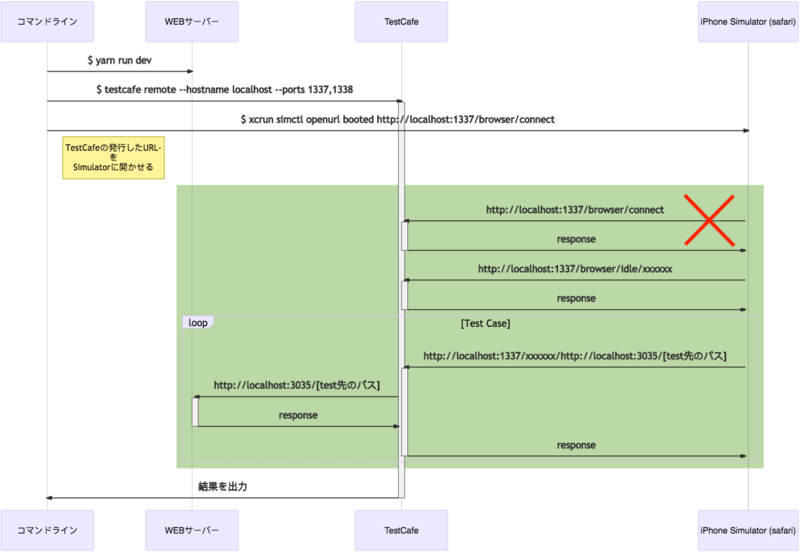
# サーバー起動しておく(テスト対象が既に起動していたら不要)
$ yarn run dev

# TestCafeの起動
$ testcafe remote --hostname localhost --ports 1337,1338

# Simulatorからアクセスさせる
$ xcrun simctl openurl booted http://localhost:1337/browser/connect
図解すると、このようなフローです。

実行例(Android Emulator)
前準備: 特になし
Emulatorを作成し、起動しておきます。
# 利用できるパッケージはあるか
$ sdkmanager --list

# なかったらインストール
$ sdkmanager "system-images;android-30;google_apis;x86_64"

# AVD(Android Virtual Device)の作成
$ android create avd -n test -k "system-images;android-30;google_apis;x86_64"

# AVDの起動
$ emulator -avd test
そして、諸々を起動します。
# サーバー起動しておく(テスト対象が既に起動していたら不要)
$ yarn run dev

# TestCafeの起動
$ testcafe remote --hostname localhost --ports 1337,1338

# Emulatorからアクセスさせる
$ adb shell am start http://localhost:1337/browser/connect

実は、これで試すとテストがうまくいかず。。 2つの罠がありました。
- connection refused
- テストが実行されない
connection refused
Android Emulatorからコマンドラインを実行してるネットワークにアクセスするには 10.0.2.2 を指さなければいけないようで、localhostを指定するとEmulator自身を指します。
https://developer.android.com/studio/run/emulator-networking?hl=ja
下記のように起動させるホストを10.0.2.2にすればいけるのでは?
$ adb shell am start http://10.0.2.2:1337/browser/connect
ということで試してみましたがうまくいかず、、 恐らく、TestCafeの実行中にブラウザをTestCafeのホストにリダイレクトさせてるのかな、という挙動でした。 (最初のアクセスは通る模様)
そして、 解決策としてはいくつかあるなと思って、試したのは下記でした。
1. Emulatorと繋がっているIPアドレスでTestCafeを起動する
# ローカルのIPアドレスを取ってくる
$ export HOSTNAME=`/sbin/ifconfig en0 inet | grep 'inet ' | sed -e 's/^.*inet //' -e 's/ .*//'`

# TestCafeの起動
$ testcafe remote --hostname ${HOSTNAME} --ports 1337,1338

# Emulatorからアクセスさせる
$ adb shell am start http://${HOSTNAME}:1337/browser/connect
うまくいく ◎

2. Android EmulatorのHostsをイジる
lvh.me(ローカルループバックドメインとして使えるドメイン)を使い、サブドメインを切りAndroid EmulatorのHostsに突っ込みます。
$ emulator -avd test -no-snapshot
$ adb root
$ adb shell avbctl disable-verification
$ adb disable-verity
$ adb reboot
$ adb root && adb remount
$ adb shell "echo 10.0.2.2 hoge.lvh.me >> /system/etc/hosts"
この状態で、
# TestCafeの起動
$ testcafe remote --hostname hoge.lvh.me --ports 1337,1338

# Emulatorからアクセスさせる
$ adb shell am start http://hoge.lvh.me:1337/browser/connect
うまくいく ○ (ただし、Emulatorの再起動とか手間なのでこの方式はちょっと面倒くさい)

テストが実行されない
Emulatorを使いまわしてテストしてると気づきづらいのですが、 Chromeの初回起動時にこのような画面が強制的表示され、入力しないとTestCafeが起動しない状態でした。
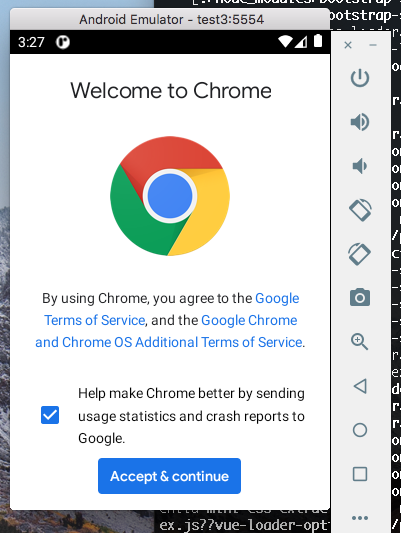
下記を実行すると表示されなくなるので、こちらで解決しました。
$ adb shell 'echo "chrome --disable-fre --no-default-browser-check --no-first-run" > /data/local/tmp/chrome-command-line'
なので、最終的には下記で実行出来るかと思います。
# サーバー起動しておく(テスト対象が既に起動していたら不要)
$ yarn run dev

# ローカルのIPアドレスを取ってくる
$ export HOSTNAME=`/sbin/ifconfig en0 inet | grep 'inet ' | sed -e 's/^.*inet //' -e 's/ .*//'`

# TestCafeの起動
$ testcafe remote --hostname ${HOSTNAME} --ports 1337,1338

# 初回起動時の画面遷移をなくす
$ adb shell 'echo "chrome --disable-fre --no-default-browser-check --no-first-run" > /data/local/tmp/chrome-command-line'

# Emulatorからアクセスさせる
$ adb shell am start http://${HOSTNAME}:1337/browser/connect
BrowserStack等の外部サービス
BrowserStackとは、実際のブラウザの実行画面をWEB経由で表示・操作できるサービスです。
ブラウザとOSの組み合わせは700以上あって、今では実機を用意するのが難しい組み合わせもWEB上で用意することができます。
TestCafeは公式で対応しているので、連携することができます。 詳細は下記をご参照ください。
https://github.com/DevExpress/testcafe-browser-provider-browserstack
レポートの出力
レポート表示形式にオプションがいくつかあり、見やすい形式を選ぶことになります。
Communityによって開発された物もあるため、選択の幅は広そうです。
https://devexpress.github.io/testcafe/documentation/reference/testcafe-api/runner/reporter.html
個人的には、これが見やすいと思いました。
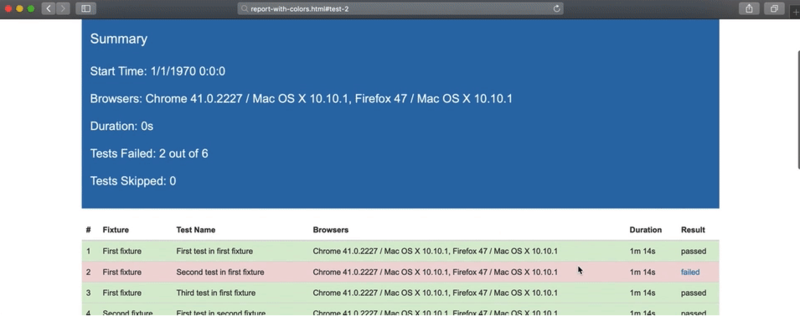
https://github.com/picuscreative/testcafe-reporter-html
おわりに
今回はTestCafeを用いてローカルの環境でPCのブラウザ・スマホのブラウザに関してE2Eテストを実施する手法を記しました。
次の記事では、お手軽に自動化する手法としてGithub Actionsを用いた方法を説明します。